


Wednesday, August 22, 2012

Tuesday, August 21, 2012
NDY Healthy Desserts: Fruit Tart

We
already know how addictive desserts can be.
Our doctors always emphasize exercise, and eat healthy. Desserts can be healthy also and still
scrumptious. Once a week, NDY will be doing
healthy desserts, that way you can have your cake and eat it too.
Fruits
are very low in energy and are filled with minerals, and vitamins, which
produces a great source of nutrients that is very beneficial for a healthy
diet. Eating lots of fruits can reduce
heart disease and some cancer.
As
you already know my family loves fruits. I wanted to create a quick dessert to enjoy
with last night dinner, but do not have my kids bouncing off the wall and could
not go to sleep early. Waking them up for school is another story by
itself.
This fruit tart is very quick, easy and only
involves 10 minutes of baking. It is not
sweet but sill haves that OMG feeling when you bite into it. It indulges your sweet
tooth desire, and it’s full of fruit, so it’s healthy right?

The recipe is also adaptable to whatever
fruit you choose. I thought I had
blueberries but I guessed someone ate them all.
Next time I am going to use peaches, apricots, nectarines, and maybe I
will get to use my blueberries.
Remember
pick up a fruit today and improve your health.
Fruit Tart
Ingredients
Crust:
1/2 cup confectioners' sugar
1 1/2 cups all-purpose flour
1 1/2 sticks unsalted butter (room
temperature)
Filling:
1 (8-ounce) package cream cheese (room temperature)
1/2 cup sugar
1 tsp. vanilla extract
Topping:
Favorite fruits of the season
Glaze:
1 (6-ounce) can frozen limeade concentrate,
thawed
1 tblsp. cornstarch
1 tblsp. fresh lime juice
1/4 cup granulated sugar
Directions
Preheat the oven to
350 degrees F.
For the crust: In a
food processor, combine the confectioners' sugar, flour, and butter, and
process until the mixture forms a ball. With your fingers, press the dough into
a tart pan. Push the crust into the indentations in the sides. Pat until the
crust is even. Bake for 10 to 12 minutes, until very lightly browned. Set aside
to cool.
For the filling and
topping: Beat the cream cheese, sugar, and vanilla together until smooth.
Spread over the cooled crust. Per your
desired preference assort fruits.
For the glaze: Combine
the limeade, cornstarch, lime juice, and sugar in a small saucepan and cook
over medium heat until clear and thick, about 2 minutes. When cool using a pasty brush glaze the tart.
Recipe
Adapted from Paula Deen
Friday, August 17, 2012
Custom Chocolate by Never Dessert You

Do you have a logo, monogram or design you want displayed on chocolate? Did you know NDY specializes in chocolate treats?
One of my talents in the food field is creating chocolate heaven treats for my clients from chocolate disks, chocolate covered Oreos, molded chocolate designs, and chocolate graham. Even though I am not a die hard fan of chocolate, there is no other candy than be portrayed more beautiful. I present you some of my work that I have done for weddings, parties, corporate events, or just for a chocolate lover special treat.

If you are interested in placing an order feel free
to contact me neverdessertyou@gmail.com
or check out my Etsy store.
Stay tuned for more awesome chocolate treats by NDY!
Wednesday, August 15, 2012
BlueBerry Granita

I had some blueberries in my refrigerator and wanted
to create a dish with them before they go bad.
I am surprised they were still inside of my fridge. If you live in my household no type of fruit
last more than a day in my house. My kids
love and fight each other over fruits.
I decided to create a refreshing dish that did not
involve baking, just a blender and a freezer.
This recipe has a sweet essence of the blueberry and lemon, which makes
a great combination. If you never had a granita it’s an Italian
semi-frozen dessert, originated in Sicily.
It’s similar to a sorbet or Italian Ice with a coarse and flaky texture
made from sugar, and fruit flavorings. There are also variants with coffee that I
have seen. The trick with granita is
during the freezing process, in intervals you have to continually scrape the
mixture with a fork, resulting in small ice crystals.

Blueberry
Granita
Ingredients
3 cups fresh blueberries,
washed and sorted
2 tsp. fresh lemon juice¾ cup sugar
1 cup water
Directions
1. Combine the sugar and 1 cup water in a saucepan over medium-low heat until the sugar is completely.
1. Combine the sugar and 1 cup water in a saucepan over medium-low heat until the sugar is completely.
2. Combine
blueberries and lemon juice in blender pulse until smooth.
3. Pour the syrup (make sure it's cooled) into
the strawberry and lemon mixture and blend to combine.
4. Pour the mixture through strainer into an 8-inch
or 9 x 13 metal pan to remove any solid bits.
Freeze for 3-4 hours, scraping the mixture with a fork every 20 to 30
minutes.
5.
Serve immediately with mint. Enjoy!
Tuesday, August 7, 2012
Mango Cheesecake
Have you ever been to the Cheesecake Factory? They have some of the most eye catching
cheesecakes. You know when you see
something that looks good but when you go try it out it not what you
imagine. Well that’s not the case with
the Cheesecake Factory. Not only they
look good but they taste off the chain.
I was looking through one of my favorite magazine subscriptions and came
across their Mango Key Lime cheesecake.
Oh boy that had my mouth watering.


When I saw the ad from Cheesecake Factory and I know my
mother-in law is visiting us, I knew right there and there what I was going to
create. - Mango Cheesecake.


You must be asking what my mother-in-law has to do with
cheesecake. Well, my mother-in-law lives
where I am originally from, St. Thomas, Virgin Islands. Mangoes are one of the sweetest things about
living in the Virgin Islands. They are juicier, plump, sweet, and words can’t
even express how good they are. When they
are yellow, red, or orange you know right there it is ripe and ready to be
devoured. Plus since it is summertime,
this is when mangoes are everywhere. One
of the joys is if your family or you know someone who has mango tree in their
yard, you never have to go to market or miss out. I remember the days I got in so much trouble
for climbing other people trees and taking their mangoes.
Well, my fiancé was talking to his mom the day before she
arrives and I told him to tell him to tell her bring some mangoes. I lighted up when she agreed. Now keep in mind I was the one to ask for mangoes,
the day she arrived she brought four and my fiancé ate all four that same
night. My heart was crushed. But I did not deviate from the plan, so I had
no other choice but head to Farmer’s Market.
This month Crazy Cooking Challenge is all about Cheesecake. I did my Mango Cheesecake with a Mango
Glaze topped with fresh fruit. Even
though the mangoes from Farmers Market was not as sweet as I envisioned them
when I ate one,I brought back the flavor when I puree them with sugar and vanilla bean.

I used Grace’s Sweet LifeRecipe. I altered the crust by using
half of almond flour and honey graham crackers mixed together with sugar and melted butter. For the filling instead of ricotta cheese I
used mascarpone cheese.
What you think of my Mango Cheesecake. I wish you was here to try it with me. Yum!


Sunday, August 5, 2012
Cocoa Colada Cupcakes
Last
week I had a case of migraines back to back.
I have a lot on my plate and this was a sign I needed to relax
myself. I wish I could go back to my
birthplace St. Thomas, Virgin Islands to relax on the beach. But
since that was not happening anytime soon, I decided to bring the islands back
to me.
For those who know me I love a good drink and I remember my first alcoholic drink was a Pina Colada. Well, not true I think it was a Coors Light I took up to taste that my father had left on the kitchen table when I was around six. Boy that was nasty. Hey don’t judge my daddy for being careless, I was just being fast. Truth be told if my father was alive he would say I would beg to taste his alcoholic drinks, I guess that’s why I love a good drink.


1 ¾ cups granulated sugar
¾ cup cocoa powder
½ teaspoon salt
1 tablespoon baking soda
1 large egg
2/3 cup vegetable oil
¾ cup buttermilk
¼ cup Irish cream liqueur
1 cup crushed canned pineapple, drained
½ cup coconut rum
For those who know me I love a good drink and I remember my first alcoholic drink was a Pina Colada. Well, not true I think it was a Coors Light I took up to taste that my father had left on the kitchen table when I was around six. Boy that was nasty. Hey don’t judge my daddy for being careless, I was just being fast. Truth be told if my father was alive he would say I would beg to taste his alcoholic drinks, I guess that’s why I love a good drink.
Well
back to the Pina Colada. I wanted to
take that Pina Colada and incorporate it into a scrumptious dessert. What about a cheesecake? Hmm, maybe next time. I decided to do a cupcake instead. So I know you have seen or maybe tasted a
Pina Colada Cupcake. But what about a
Cocoa Colada Cupcake with a subtle flavor combination of chocolate, pineapple
and coconut rum.

If you not a fan of
alcohol stay away, because I promise, you would taste the alcohol. Not only there is alcohol in the batter, but
in the cream cheese frosting, and in the chocolate glaze.

After
I devour this cupcake, my headache was all gone and had nothing but a smile on
my face all day.

Cocoa Colada Cupcakes
Yields
24-27 cupcakes
Cupcake
2
cups all-purpose flour1 ¾ cups granulated sugar
¾ cup cocoa powder
½ teaspoon salt
1 tablespoon baking soda
1 large egg
2/3 cup vegetable oil
¾ cup buttermilk
¼ cup Irish cream liqueur
1 cup crushed canned pineapple, drained
½ cup coconut rum
Chocolate Glaze
1 ½
cups semisweet chocolate chips
6 tablesppons unsalted butter
2 tablespoons light corn syrup
2 tablesppons coconut rum
1/2 cup toasted coconut for topping
Coconut Cream Cheese
Frosting
½ cup (1 stick/8 Tablespoons) butter (cool)
8 oz. cream cheese (directly from fridge)
1/2 teaspoon vanilla extract (always use pure vanilla extract if possible)
1 1/2 teaspoons coconut extract (you may want to start with just 1 teaspoon of coconut extract, you can always add more, but you can’t take it out!)
4 cups powdered confectioner’s sugar
1 Tablespoon Dark Rum
½ cup (1 stick/8 Tablespoons) butter (cool)
8 oz. cream cheese (directly from fridge)
1/2 teaspoon vanilla extract (always use pure vanilla extract if possible)
1 1/2 teaspoons coconut extract (you may want to start with just 1 teaspoon of coconut extract, you can always add more, but you can’t take it out!)
4 cups powdered confectioner’s sugar
1 Tablespoon Dark Rum
1 Tablespoon Coconut Rum
Cupcake Directions:
1.
Preheat the oven to 350*F. Line a cupcake pan with 24 cupcake
liners. Set aside.
2.
In a medium bowl, sift together the flour, sugar, cocoa
powder, salt and baking soda. Set aside.
3.
In a large bowl, use and electric mixer on medium speed
to beat together the egg, oil, buttermilk, Irish cream liqueur, pineapple, and
rum until well combined. Turn the mixer
to low and add the flour mixture, beating well just until combined.
4.
Divide the batter evenly among the cupcake liners and
bake for 16 to 20 minutes, or until a toothpick inserted into the center of the
cupcake comes out clean. Cool on a wire
rack for 5 minutes or until cool enough to handle. Remove the cupcakes from the pan and cool
completely.
Frosting Directions:
1.
Place butter in a large mixing bowl and blend until
smooth. Add cream cheese and blend until well combined, about 30 seconds.
2.
Add vanilla extract, coconut extract and powdered sugar
(1 cup at a time) and blend on low speed until combined. Increase to medium
speed and beat until it begins to get fluffy. Slowly add the
rum. Beat until fluffy, about 1 minute.
Chocolate Glaze Directions:
1.
Heat the chocolate chips, butter and corn syrup atop a
double boiler set at low heat.
2.
Stir continuously until the chocolate melts, and the
remove from the heat.
3.
Add the rum and stir until smooth.
Frost the cooled cupcakes and then
drizzle the glaze atop the frosting.
For added flavor and texture add a touch of shredded coconut. Feel free to decorate with maraschino cherries
and paper umbrellas to get the full island feeling.
Cupcake recipe updated from Intoxicated Cupcake,
Frosting Adapted Glorious Treats
Wednesday, August 1, 2012
Nutella Swirl Blondies
I made
these blondies last week and totally forgot to blog about them.

I love that this recipe does not ask for much chocolate and is so gooey, and rich. It is sweet and full of the butterscotch flavor. And the best part is it is topped with Nutella and cream cheese.
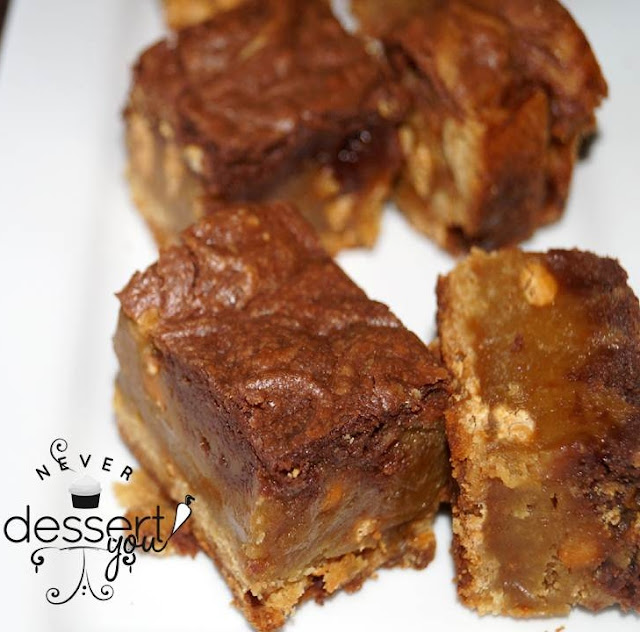
I cut them up into small squares, and served at my job. These bad boys went fast. Everyone loved the sweet breakfast treat that quenched their sweet tooth desire.


I love that this recipe does not ask for much chocolate and is so gooey, and rich. It is sweet and full of the butterscotch flavor. And the best part is it is topped with Nutella and cream cheese.
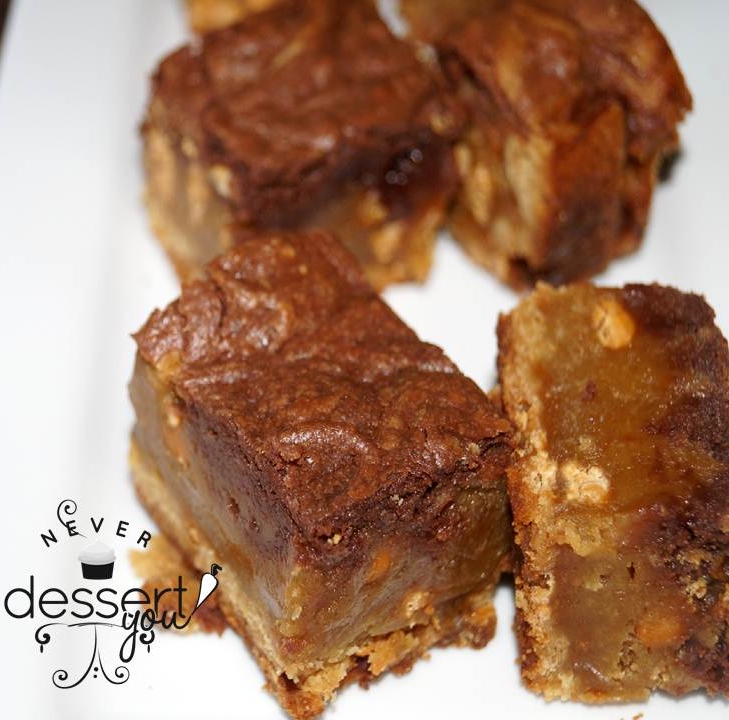
I cut them up into small squares, and served at my job. These bad boys went fast. Everyone loved the sweet breakfast treat that quenched their sweet tooth desire.

Nutella-Swirl
Blondies
Ingredients
1 ½ cups
packed light brown sugar
2 sticks
unsalted butter, cut into small pieces
2 large
eggs plus 1 large yolk
1 tsp.
vanilla extract
2 ¼ cups
all-purpose flour (I used unbleached flour)
½ tsp.
baking powder
¼ tsp.
salt
1 ½ cups
butterscotch chip
4 oz.
cream cheese, at room temperature
¾ cup
Nutella
Directions
1.
Preheat oven to 375F. Grease a 9-by-13 inch baking pan and line
with foil, letting ends of foil hang 3 inches over the 2 long edges. Grease foil.
2.
Combine
sugar and butter in a large pan over medium heat. Cook, stirring often, until butter has melted
and sugar has dissolved (mixture will not look combined). Remove from heat and let cool slightly. Whisk in 2 whole eggs and vanilla.
3.
A bowl, whisk flour with baking powder and
salt. Gradually add flour mixture to
sugar mixture: mix until smooth. Fold in
butterscotch chips. Spread evenly in pan.
4.
Using
an electric mix on medium speed, beat cream cheese with egg yolk and Nutella
until smooth. Drop spoonfuls’s of
Nutella mixture over batter in pan and use the tip of a small knife to swirl it
in, making a decorative pattern. Be
careful not to scrape bottom of pan.
5.
Bake
until blondies are just set in the center and a toothpick inserted into center
comes out clean, 25 to 30 minutes. Let
cool in pan on a wire rack, then cover and refrigerate until thoroughly chilled,
at least 2 hours. Run a sharp knife
along edges of pan to loosen, and then remove blondies from pan using foil
handles. Cut into squares and serve at
room temperature.
Recipe adapted from ALL
You Magazine
Subscribe to:
Posts (Atom)
